This chapter contains the following topics:
Cash accounts are those accounts from which you allow cash to be disbursed to persons outside your company. They often correspond to a bank account. Passport provides for an unlimited number of cash accounts.
All accounts are included in Valid G/L Accounts, but some accounts are also included in separate files of their own so that additional information about those accounts can be recorded. Cash accounts fall into this category, and the additional information they require is the current check number. Keeping them separate also allows the system to validate the cash account when you:
| • | Post cash receipts (in A/R) |
| • | Cut computer checks (in A/P or PR) |
| • | Make checkbook entries (in C/R) |
Select
Cash accounts from the CTL menu.
This selection allows you to enter, modify, or delete cash accounts.
Graphical Mode
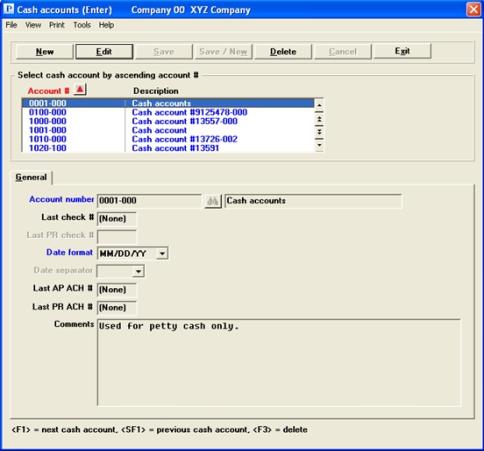
The following screen displays:

The list box displays up to 6 existing cash accounts at a time. You may sort the list by account number in ascending or descending order. Click on the column name or the arrow to the right of the column name to change the sort or use the View options. Only column names in red may be sorted.
To find a cash account via the list box, the focus must be on the box (the data displays as blue). To locate a cash account, start typing the number. You may also use the up/down arrows, Page up, Page down, Home and End keys to locate an account. The <F1> and <SF1> keys function the same as the up/down arrow keys.
Cash accounts that display in the list box are available for changes or deletion. The fields for the selected cash account display in the lower part of the screen.
When a cash account is found, you may select the <Enter> key or Edit button to start editing.
When you are adding or editing an account you have the following button options:
| Button | Keyboard | Description |
|
New |
Alt+n |
To add a new cash account |
|
Edit |
Alt+e |
To edit an existing cash account |
|
Delete |
Alt+d |
To delete an existing cash account. You may also use the <F3> key. See Cash Account Deletion |
|
Save |
Alt+s |
To save a record you added or edited |
|
Save/New |
Alt+w |
To save what you added or edited and start entering a new cash account |
|
Cancel |
Alt+c |
To cancel adding or editing a cash account |
|
Exit |
Alt+x |
To cancel adding or editing a cash account. To exit to the menu. You may also use the <Esc> key |
Menu Selections
At the top left of the screen, a variety of menu selections are available. Most of these are the similar from screen to screen. If a menu selection is grayed out you will not be able to access it. The selections that are unique to this screen are explained here:
Select Print to print a list of cash accounts. See Printing Cash Accounts Lists
Character Mode

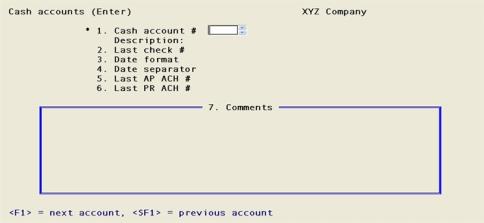
Enter the following information:
Options
Enter the cash account number, or use one of the following options:
|
<F1> |
For the next cash account |
|
<SF1> |
For the previous cash account |
|
Format |
Your standard format for account numbers, as defined in Company information |
|
Example |
Press <F1> |
If you are in change mode, or if you are in add mode and the new cash account has already been defined via the Valid G/L accounts selection, then this field displays automatically and may not be changed.
Otherwise, you are informed that this cash account is not a valid G/L account and are asked whether you wish to add it. If you have merely made a keying error, select No to select a different account. If you really wish to add a new account, answer Yes and enter a description of the cash account. The account will be added to both.
If you are using General Ledger, Passport recommends that you add the account first to G/L Chart of accounts and only then add it to Cash accounts. However, there is nothing stopping you from adding it to the Chart of accounts later. Whenever adding any new account, you should first consult your accountant.
|
Format |
Up to 30 characters |
|
Example |
In this example the description displays automatically |
This field cannot be entered unless you are using PBS Accounts Payable and/or Payroll.
Those modules use this number to determine the next check number when printing checks. When processing direct deposit ACH checks are not used. So, if you are using direct deposit ACH file processing in Accounts Payable or Payroll the Last AP ACH # and Last PR ACH # are used.
If you only cut A/P checks from this cash account, enter the last A/P check number used.
If you only cut PR checks from this cash account, enter the last PR check number used.
If you cut both A/P and PR checks from this cash account, use the option to specify separate last check numbers for A/P and PR.
Press <F2> to enter separate last check numbers for A/P and PR.
|
Format |
999999 (in each field, if two are present) |
|
Example |
Type: 100 if you next check number is 101 |
|
Note |
If you have been using I/C and are now installing A/P or PR, be sure to enter a last check number for any existing cash accounts which you plan to use for checks in the new packages. |
This field cannot be entered unless you are using PBS Payroll.
|
Format |
999999 (in each field, if two are present) |
|
Example |
Type: 1100 if your next check number is 1101 |
This field can only be entered if you are using PBS Accounts Payable and/or Payroll.
Those packages use this field to determine the format of the date field on the check. It is used in conjunction with Date separator field which determines the separator value. The four formats are listed in the table below:
|
Character Mode |
Graphical Mode and Format |
Examples using slashes |
Changeable separator |
|
1 |
MM/DD/YY |
12/31/10 |
N |
|
2 |
MMDDCCYY |
12/31/2010 |
Y |
|
3 |
DDMMCCYY |
31/12/2010 |
Y |
|
4 |
CCYYMMDD |
2010/12/31 |
Y |
Enter the format that best fits your business.
|
Format |
Select one from the list above |
|
Example |
Select MM/DD/YY or type: 1 |
This field cannot be entered unless you are using PBS Accounts Payable or Payroll or if you are using the MM/DD/YY format in the Date format field.
Table three provides the five separate values.
|
Character Mode |
Graphical Mode |
Separator Examples |
|---|---|---|
|
1 |
None |
12312015 |
|
2 |
Dash |
12-31-2015 |
|
3 |
Period |
12.31.2015 |
|
4 |
Space |
12 31 2015 |
|
5 |
Slash |
12/31/2015 |
Enter the separator value.
|
Format |
Select one from the list above |
|
Example |
This field cannot be entered based on the value entered in the Date format field |
This field can only be entered if you are using PBS Accounts Payable.
Accounts Payable uses this number to determine the next ACH transaction number. This number will be used instead of a check number when running Print checks and post. All history reports and drill down screen including processing in Check Reconciliation will use this number.
If you only make A/P payments from this cash account, enter the last A/P transaction number used.
|
Format |
999999 |
|
Example |
Type: 000100 |
This field can only be entered if you are using PBS Payroll and if you are using the Electronic payment method of direct deposit. The Report only method of direct deposit will not use this number.
Payroll uses this number to determine the next direct deposit ACH transaction number. This number will be used instead of a check number when posting checks. The vendor history reports, view vendor history and drill down screen including processing in Check Reconciliation will use this number.
If you only cut PR checks from this cash account, enter the last PR check number used.
|
Format |
999999 |
|
Example |
Type: 000100 |
|
Note |
A cash account must be entered in a bank record with a Company ACH bank type in order for the direct deposit ACH numbers to be utilized. |
Enter any comments about the cash account.
In character mode, this field uses the PBS text editing functions as described in the Using Notes section of the Use of Function Keys, Tool Bar and Windows chapter.
|
Format |
Ten lines of 65 characters each |
|
Example |
Type: cash account |
A cash account cannot be deleted if it is currently in use in the Control information selection of any PBS application. A cash account should not be deleted if it has been used for any open or un-posted payment or cash receipt transaction.
Character Mode
Field number to change ?
Options
Make any needed changes. For an existing entry, you may also use one of the options:
|
<F1> |
For the next cash account |
|
<SF1> |
For the previous cash account |
|
<F3> |
To delete this cash account |
Upon pressing <Enter> with this field blank, your entry will be accepted and the cursor will be positioned at Field #1 for the next entry.
Select
Reports from the CTL menu. Then select Cash accounts.
Graphical Mode
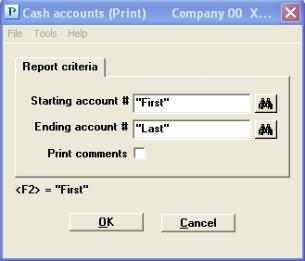
The following screen appears:

Character Mode
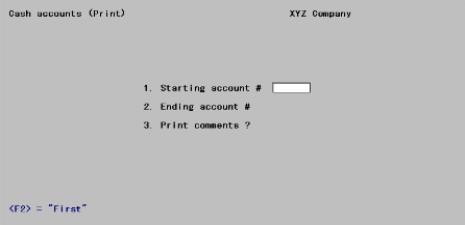
The following screen displays:

Enter the following information:
Starting account # and
Ending account #
Enter the starting and ending account numbers or use the option. Follow the screen instructions.
|
<F2> |
For the “First” (Starting account # field) or “Last” (Ending account # field) cash account |
|
Format |
Your standard format for account numbers, as defined in Company information |
|
Example |
Press <F2> at each field for First through Last |
Your answer here determines whether comments will be printed.
|
Format |
Graphical: Check box where checked is yes and unchecked is no. The default is unchecked Character: One character, either Y or N. There is no default |
|
Example |
Graphical: Check the box Character: Type Y and then press <Enter> |
Make any needed changes. Upon Selecting OK, a window with a list of printers will display. Select a printer and the requested report will be printed.
If needed, refer to the Printing section of the Starting PBS, Menus and Printing chapter.